:target
Для перехода к выбранному фрагменту документа, в адресе пишется символ # и указывается имя идентификатора. К примеру, в адресе http://www.w3.org/TR/css3-selectors/#target-pseudo происходит переход к элементу, атрибут id которого задан как target-pseudo. Такая запись адреса называется «целевой элемент».
Псевдокласс :target применяется к целевому элементу, иными словами, к идентификатору, который указан в адресной строке браузера.
Псевдоклассы
- :active
- :any-link
- :blank
- :checked
- :current()
- :default
- :defined
- :dir()
- :disabled
- :empty
- :enabled
- :first
- :first-child
- :first-of-type
- :focus
- :focus-visible
- :focus-within
- :fullscreen
- :future
- :has()
- :host
- :host()
- :host-context()
- :hover
- :indeterminate
- :in-range
- :invalid
- :is()
- :lang()
- :last-child
- :last-of-type
- :left
- :link
- :local-link
- :not()
- :nth-child()
- :nth-col()
- :nth-last-child()
- :nth-last-col()
- :nth-last-of-type()
- :nth-of-type()
- :only-child
- :only-of-type
- :optional
- :out-of-range
- :past
- :placeholder-shown
- :read-only
- :read-write
- :required
- :right
- :root
- :scope
- :target
- :target-within
- :user-invalid
- :valid
- :visited
- :where()
Синтаксис
1 2 3 4 | |
Спецификации
Примеры
Пример 1
В данном примере целевой элемент выделяется цветом фона.
1 2 3 4 5 6 7 8 9 10 11 12 13 14 15 16 17 18 19 20 21 22 23 24 25 26 27 28 29 30 31 | |
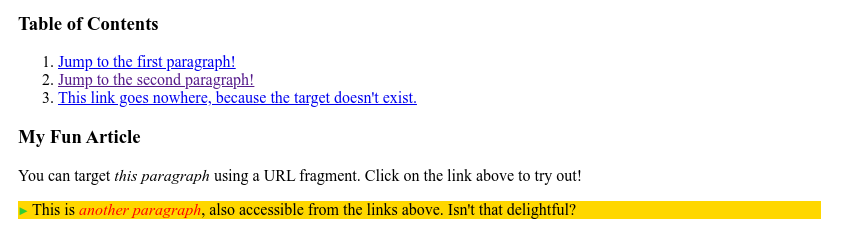
Пример 2
Псевдокласс :target может быть использован для выделения части страницы, которая была связана, чтобы сформировать оглавление.
1 2 3 4 5 6 7 8 9 10 11 12 13 14 15 16 17 18 19 20 21 | |
1 2 3 4 5 6 7 8 9 10 11 12 13 14 15 16 | |
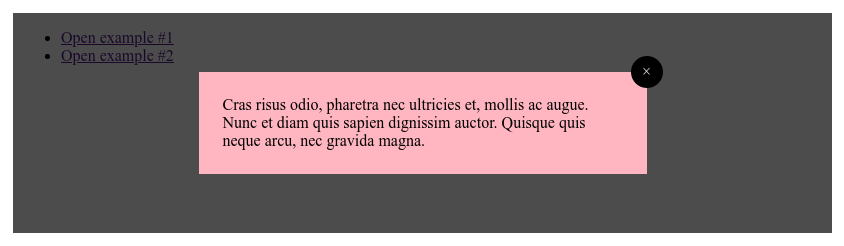
Пример 3
Вы можете использовать псевдокласс :target для создания лайтбокса без использования JavaScript. Этот метод основан на способности якорных ссылок указывать на элементы, которые изначально скрыты на странице. После нацеливания CSS изменяет свое отображение так, чтобы они отображались.
1 2 3 4 5 6 7 8 9 10 11 12 13 14 15 16 17 18 19 20 21 22 23 24 25 26 | |
1 2 3 4 5 6 7 8 9 10 11 12 13 14 15 16 17 18 19 20 21 22 23 24 25 26 27 28 29 30 31 32 33 34 35 36 37 38 39 40 41 42 43 44 45 46 47 48 49 50 51 52 53 54 55 56 57 58 59 | |
Ссылки
- Псевдо-класс
:targetMDN (рус.)